Have you ever wondered what voodoo is being worked by the linkages at the rear of your bike? Do you know why a single pivot bike rides differently to a four-bar design, or why a VPP link climbs so well? Do you know why your suspension stiffens up under braking or why your bike bobs up and down while you pedal? It’s time to strap in and engage your inner nerd as we delve deep into the inner workings of the darker arts of rear suspension.
To unlock the mysteries of rear suspension, we called on the expertise of Ruben Torenbeek, renowned engineer and designer of the RAAW Madonna, to bring you a two-part, in-depth examination of rear suspension function and design. Suspension design is a very complex topic, even basic explanations lead to challenging theories. In this first part, we guide you through the basic properties of rear suspension. No matter if you’re new to bikes and just curious, or if you are already very familiar with the topic of suspension and looking for some more, you will find what you are looking for right here!
Hardtails and full-suspension bikes
Over the past decades, the development of suspension forks and frames has grown exponentially and set new standards in comfort, efficiency and the capabilities of bikes. Nowadays, the majority of mountain bikes feature a suspended fork, but what we are looking into, is the suspension of the rear wheel.
Mountain bikes and E-mountain bikes can be separated into two groups, hardtails and full suspension bikes. Bikes with a rigid connection to the rear wheel are called ‘hardtails’, bikes with a suspended connection are called ‘full suspension bikes’ – this is the ‘rear suspension’.

Function of rear suspension
Rear suspension can have a number of different purposes, from improving comfort to increasing traction in rough terrain. Independent of its purpose, rear suspension always works by the same principle; a spring suspends the rider while a damper absorbs energy coming from impacts on the rear wheel. Designers and engineers have created different suspension designs over the past decades, all with different riding characteristics. The characteristics of pedaling, braking and impact absorption define suspension design.
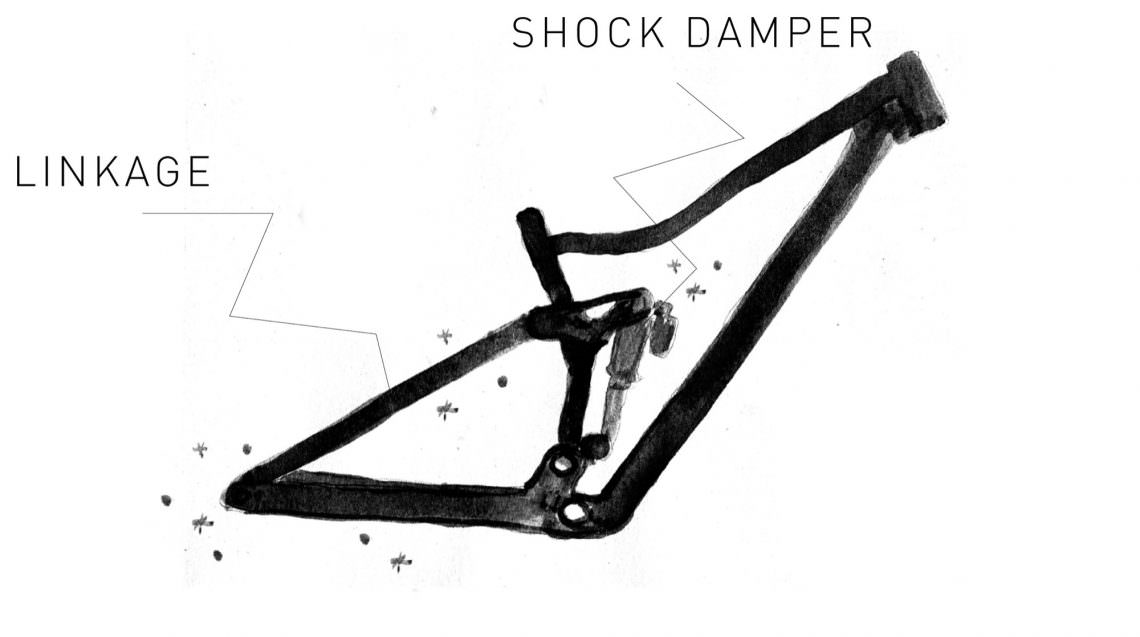
Elements of the rear suspension
Suspension design works with two main elements. First is the shock spring and damper, often called the shock. The second element is the rear frame components that connect the rear wheel to the shock. Frame designers and shock designers work hand in hand to create a system that works as a package. The bike industry offers a very rich diversity of suspension designs, unlike, for example, motor cycles where the majority share the same design.
Designing suspension requires knowledge and experience. Every suspension design aims for a certain purpose, feel and handling. Before getting into suspension design it’s essential to understand the theory of suspension characteristics. How do different designs influence pedaling? What happens to the suspension when braking and in what way does it handle impacts? It’s time to understand the characteristics of rear wheel suspension and how they define the handling on the trail.
The three characteristics of rear wheel suspension
To understand suspension, we must first understand that impact absorption, pedaling efficiency and braking efficiency are related. If for example pedaling efficiency were completely isolated from everything else, a designer could optimize it perfectly – it would be easy, but this isn’t the reality. The inherent compromise of suspension characteristics is the reason why suspension design is about finding the right balance for its intended purpose.
Impact absorption
The main goal of a suspension system is to absorb impacts, or said differently, to absorb the energy coming from an impact to the rear wheel.
Impact absorption as a characteristic is defined by two elements: the wheel-path and the wheel-rate. The wheel-path is the exact line that the axle of the rear wheel follows during a full compression of the suspension. The wheel-rate is the shock compression ratio plus the leverage ratio
Wheel Path
During a full compression of the suspension, the wheel axle follows a defined path. The axle path is different on all suspension designs and is controlled by the pivot points of the suspension.
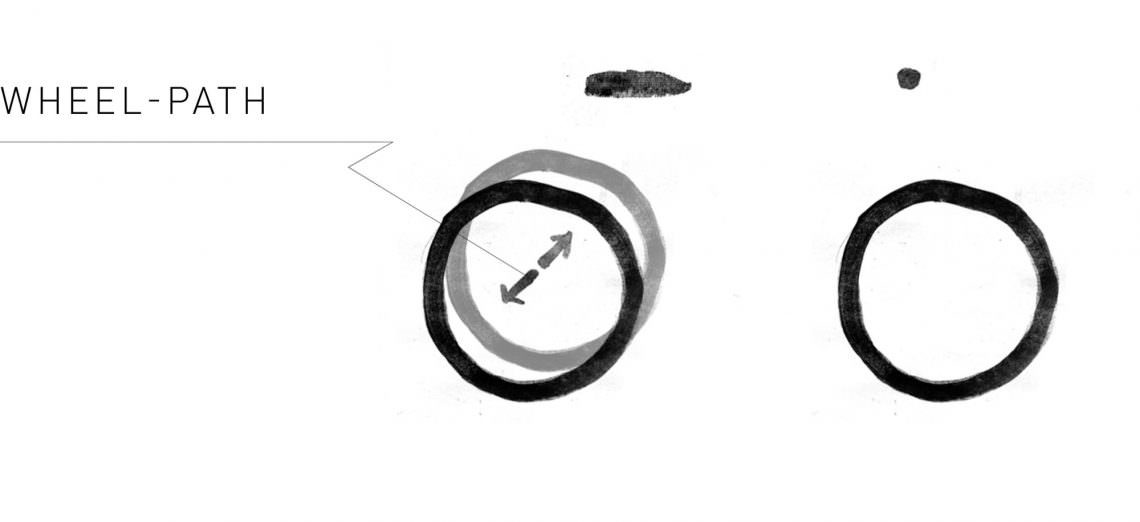
The impacts coming to the rear wheel hit the tire from a certain angle, depending on the size of the obstacle. Ideally the axle path should move with the direction of the impact, meaning that a rearward axle path is generally seen as better for impact absorption. However, the reality is that suspension can’t be designed solely around the axle path. It is important to find the best balance of suspension characteristics which are tuned depending on the application the bike is designed for.

Wheel Rate
The second characteristic of impact absorption is the wheel rate. The wheel rate is the sum of two ratios — the leverage ratio and the shock compression ratio. The leverage ratio is the ratio between the travel of the rear-wheel and the travel of the shock damper. The leverage ratio is defined purely based on the mechanical construction of the suspension and can change throughout the stroke.
Second comes the shock compression ratio. Shock dampers have a compression ratio, comprised of the spring rate or air pressure and how much low and high speed compression damping has been added, that can change throughout the travel. The force on the shock and the amount of compression are not always linear. The shock compression ratio plus the leverage ratio gives you the wheel rate.
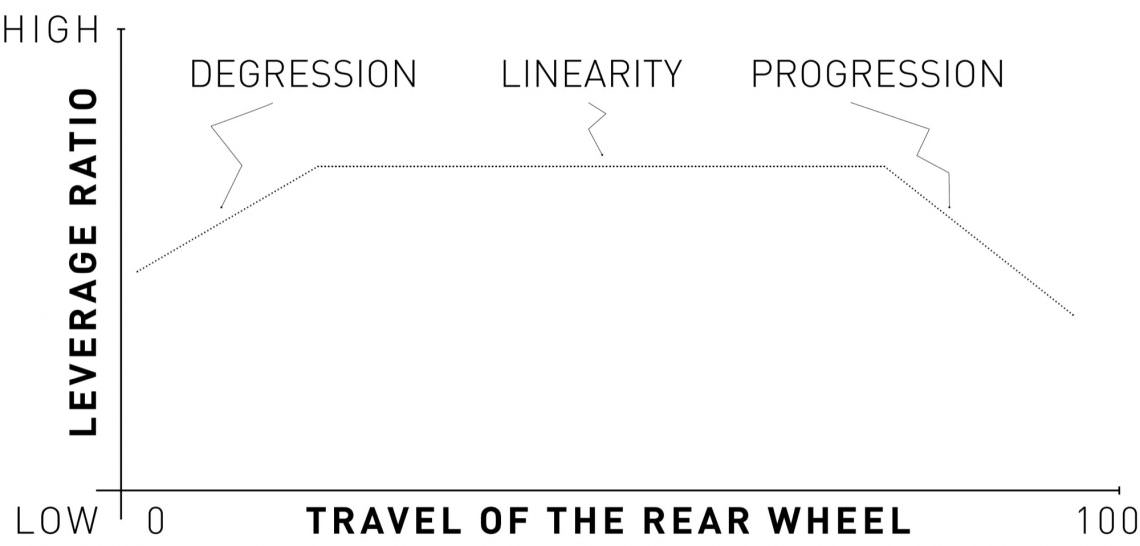
Suspension can be designed to have a different wheel rate throughout the travel, optimized for specific situations. To describe the wheel rate we use the terms digression, linearity and progression.
Digression
The force required to compress the shock damper decreases as travel increases. Digressive suspension means that travel is used easily and the suspension tends to feel like it falls into the travel.
Linearity
The force required to compress the shock damper stays the same as the travel increases. Linearity often goes hand in hand with predictability; the amount of travel used stays the same throughout the travel.
Progression
The required force to compress the shock damper increases with the travel. The suspension ramps up and the more travel that is used, the harder it is to compress the suspension. Enduro and downhill bikes tend to have suspension designs with progression to prevent bottoming out and to ensure that the full travel is used efficiently but not excessively.
Impact absorption can be defined as the suspension’s ability to absorb kinetic energy from impacts on the rear-wheel. The wheel-path and the wheel-rate define impact absorption and are related to other characteristics of the suspension. Depending on the purpose of the bike the impact absorption can be more or less of a priority. Downhill bikes will generally place the highest priority on impact absorption, but consideration needs to be given to balance characteristics like pedaling or braking efficiency.
Pedaling Efficiency
Two decades of designing suspension systems were mainly influenced by one big question: how can we design a suspension system that doesn’t take energy from the rider? Bikes should be as efficient as possible, in order to translate every watt of the rider into propulsion (for e-bikes the scenario is different as you have a complementary engine) Riding a bike is a very dynamic action. Unlike a motorcycle with an engine that sits where it is and a relatively static riding position, a bike rider moves in all directions. Pedaling efficiency is about the capability to transfer the energy from the rider to the rear wheel, defined by anti-squat and pedal kickback.
Anti-squat
Remember that feeling you get when you push the gas pedal in a sports car? You get pushed back in your seat by the acceleration. The acceleration causes mass transfer and that is what you feel. Basically, when you ride your bike and pedal, the same thing happens. As the bike accelerates and causes mass-transfer, your body and bike are pushed back, just like sitting in that accelerating sports car.
Pedal accelerations push your weight towards the rear wheel and the rear-suspension compresses. So, just by pedaling your bike, the rear suspension reacts by compressing. This is also called ‘squatting’.
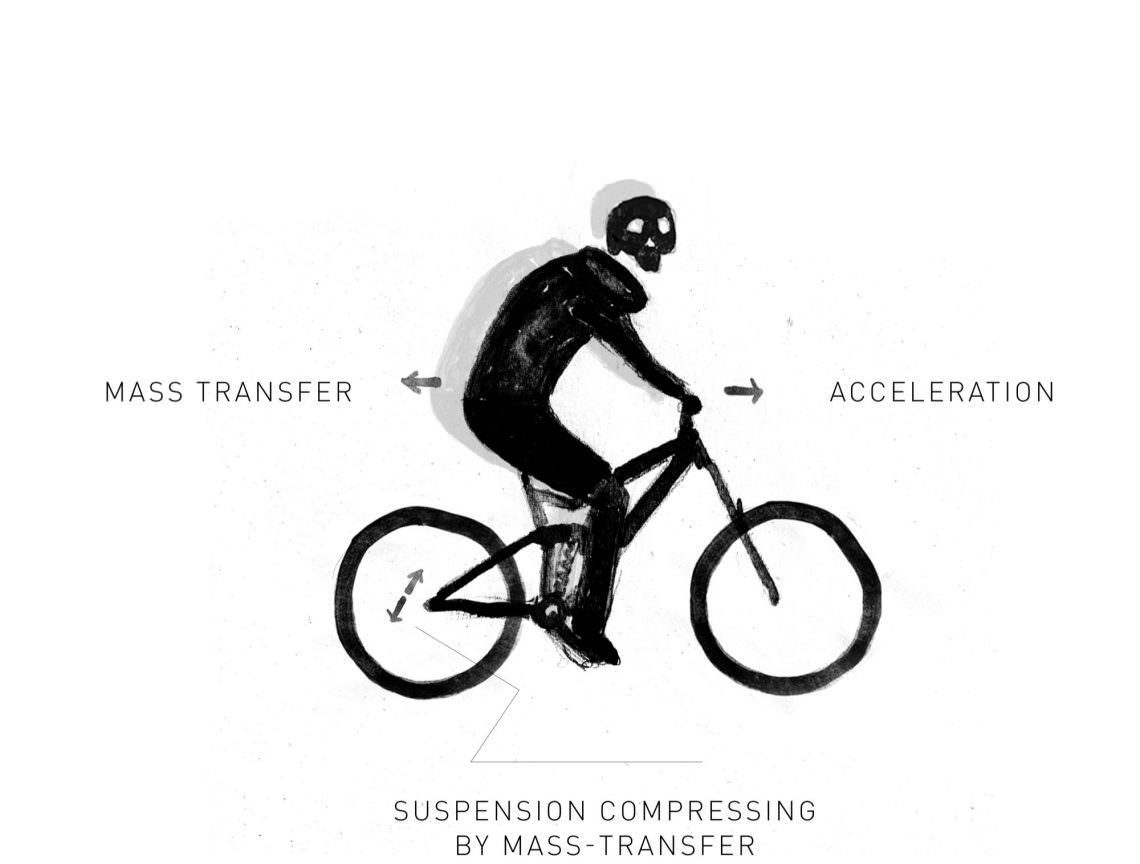
But mass-transfer isn’t the only thing that happens during pedal-strokes. The chain-force pulls on the rear-suspension, extending it and lifting the rider. Anti-squat is the term describing the amount the suspension reacts to the chain force. Anti-squat is measured in percentages. 0% anti-squat means there is no influence from the chain-force on the suspension and mass transfer will make the suspension compress. 100% anti-squat means that the chain-force counteracts the mass-transfer exactly, and so the bike will not squat into its travel. Less than 0% will actually amplify what mass-transfer already does and more than 100% anti-squat will make the suspension extend.
Is 100% anti-squat the best?
The previous explanation doesn’t take in consideration that the act of pedaling a bike is very dynamic. People ride their bikes very actively, they move, push, pull, and influence the centre of gravity. If the centre of gravity were static, anti-squat would be an easier topic. Designers and companies have different theories about anti-squat values and optimize for what they think is right. There is certainly not one truth and things are going to get even more complicated.
Gears and Anti-Squat
Anti-squat is the reaction of the rear suspension to the chain force. This means that the design of the suspension plays a role, but also the position and direction of the chain. The upper chain-line is key in the design of suspension. Derailleur shifting is the standard on today’s bikes and all gear combinations have different chain-lines. This results in different anti-squat values for different gears. In general, shifting cogs on the cassette has less of an influence on the anti-squat value than the chainrings on the front. The current trend of one-by drivetrains makes it a little easier to optimize anti-squat values. A crankset with two or three chainrings results in higher anti-squat values on the smallest chainring.
During the compression of the suspension, the chain-line and the geometry of the suspension also changes, resulting in different anti-squat values for different stages of the travel. Anti-squat as a term isn’t very hard to understand, but the dynamics of the rider and factors like chainring sizes make it a very complicated topic with no single solution.
Pedal-kickback
So why not have bikes with very high anti-squat values? Imagine pedaling up a rocky trail; the suspension takes impacts from the terrain and gives you the traction to make that climb. You are pedaling up and your suspension is active, this means there is tension on the chain and your suspension compresses. Most of the suspension designs don’t have a constant chain length throughout the complete travel; chain growth occurs. So back to the situation of pedaling up a rocky trail; the compression of your suspension causes chain-growth and pulls on your cranks. The unpleasant feel of your pedals being pulled back is what is called pedal-kickback. Pedal-kickback can only occur when the freehub is engaged, during pedaling or at impacts during ‘slow’ coasting. Pedal-kickback is measured in degrees of rotation of the crank assembly. Pedal-kickback depends on the position and direction of the chain, just like anti-squat. A smaller chainring on the crank will give more pedal-kickback.
Braking efficiency
Anti-rise
We now have to consider how the rear suspension design impacts on braking performance, why do some bikes stiffen up under braking, while others remain fully active? The rear brake consists of a rotor, mounted to the rear wheel and a caliper mounted to the frame of the bike. When braking, there is a force coming from the brake going into the frame. On a full suspension bike this force influences the function of the suspension. The level of braking influence is defined by the term anti-rise. Essentially anti-rise is a measure of how much the suspension compresses or extends by the force of braking. Anti-rise can be designed to keep the geometry of the bike balanced under braking or to have active suspension under braking.
Stop!
If you’ve ever had to brake all of a sudden and stop as fast as possible, you know the feeling of pressure on your hands. When you brake, you decelerate and weight transfer pushes you to the front. The front wheel gets more of the weight distribution and the rear wheel less and in reaction, the rear suspension extends. By braking, the rear suspension extends. Anti-rise is the reaction of the suspension compressing as a result of the force on the rear brake. Mass-transfer makes the suspension rise, anti-rise can be used to counteract that. The position of the rear brake and the geometry of the suspension define how the suspension reacts to braking.
Quantifying anti-rise
Anti-rise is measured in percentages, 0 and 100 percent are a good start to understand what the values mean.
0% anti-rise:
- The brake has no influence on the suspension, the suspension will extend because of mass-transfer.
- The suspension is not influenced by braking and stays active.
- The geometry of the bike changes.
100% anti-rise:
- The brake has influence on the suspension. The combination of the influence and mass transfer ensures that the suspension doesn’t compress or extend under braking.
- The geometry of the bike doesn’t change and stays balanced.
The ideal amount of anti-rise depends on the purpose of the bike and is very much related to other characteristics like anti-squat. As with all characteristics, they are in some way related to each other and must be designed with balance in mind, to achieve the best compromise for the intended application.

And that’s all for part one folks, we hope you now have a better understanding of the basics of suspension. However, it’s important to remember that while all the concepts may be straightforward, suspension characteristics are all related and dynamic, influencing each other and changing as the system moves through its travel. This is what makes suspension so complicated, but also so interesting.
In the next instalment, we will take you through the different properties of the most common rear suspension designs. Read part II of this story in ENDURO issue #037 in our free app for iOS or Android or check it out on our website here: How your bike’s suspension design affects its performance on the trail!
This article is from ENDURO issue #036
ENDURO Mountainbike Magazine is published in a digital app format in both English and German. Download the app for iOS or Android to read all articles on your tablet or smartphone. 100% free!

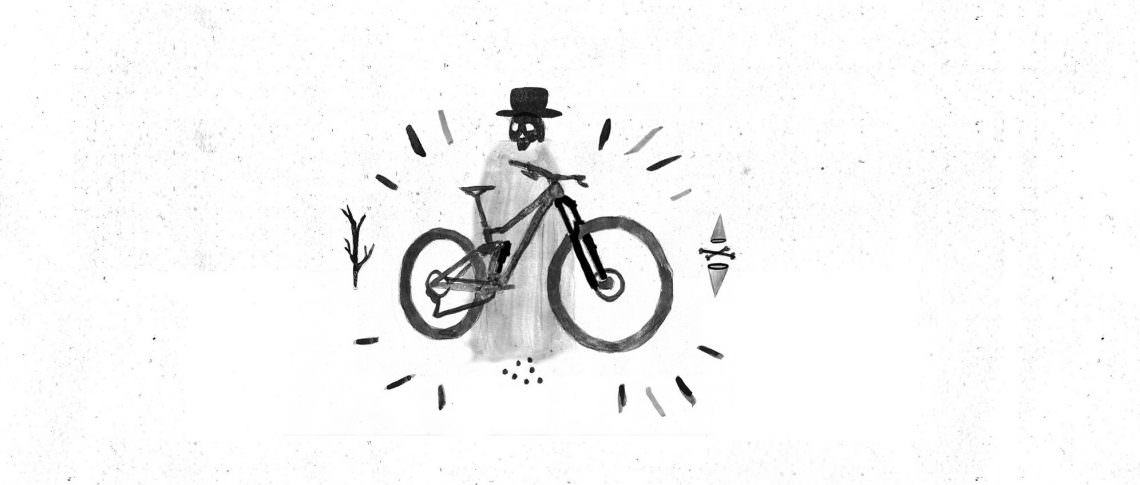
Words: Trevor Worsey, Ruben Torenbeek Illustration: Julian Lemme
Did you enjoy this article? If so, we would be stoked if you decide to support us with a monthly contribution. By becoming a supporter of ENDURO, you will help secure a sustainable future for high-quality mountain bike journalism. Click here to learn more.